123.hp.com/ljm134a - HP LaserJet Ultra MFP M134a
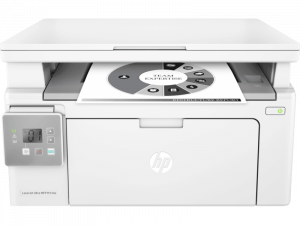
When it comes to the low printing costs and efficient printing performance, you can definitely rely on the HP Laserjet MFP m134a printer. You have to go through some preliminary steps to set up the printer for excellent printing performance.
The initial printer setup includes some tasks like unboxing, loading papers, driver installation, etc. You will get everything here to set up your 123.hp.com/ljm134a printer device.
- 123 HP LaserJet Ultra MFP M134a Initial Printer Setup
- 123 HP Laserjet M134a Setup Driver and User Guide Download
- 123 HP LaserJet Ultra MFP M134a Driver Installation
- 123 HP LaserJet Ultra MFP M134a Wireless Setup
- Troubleshooting HP Laserjet M134a Printer
123 HP LaserJet Ultra MFP M134a Initial Printer Setup
You can’t use a packed printer, of course. That’s why you might need some guidelines on how you can efficiently use the newly bought HP Laserjet M134a printer. Follow the steps below to successfully accomplish the initial printer setup.
- Cut the sticky tape on the printer package and carefully take out the 123.hp.com/laserjet M134a printer from the package. Remove the stickers, tapes from the body of the 123 HP Laserjet M134a printer.
- You have to put on the dust cover on the input tray. To do that, pull out the paper input tray. Get the dust cover from the printer. Remove the tapes from the cover.
- Unfold the dust cover from the sides. Place the dust cover inward unless it gets the appropriate position.
- You need to hinge the pins of the dust cover to the hinge slots above the input tray. Make sure that the pins snap to their exact positions.
- Now load papers of the same dimensions to the paper tray. Next, connect the provided power cord from the printer to the nearby power socket. Save all your preferences pon the printer. Next, you have to download and install the latest compatible driver for the 123.hp.com/setup Laserjet M134a printer.
123 HP Laserjet M134a Setup Driver and User Guide Download
The user guide is an important part of your HP Laserjet M134a printer like the driver. The user guide will let you cooperate with the printer issues. You can get help with any driver installation or setup from the user guide. Go with the download link to get the user guide for the HP Laserjet printer.
HP Laserjet M134a Driver for Windows
If you have to connect your HP Laserjet M134a to the Windows computer, then go through the guidelines below.
- You can easily avail of the latest HP Laserjet M134a printer driver for Windows through the provided download link.
- Once you downloaded the driver, you have to track the instructions on the screen. This will complete the driver installation process on your Windows PC.
HP Laserjet M134a Driver for Mac
Mac computers too need a compatible driver to cooperate with the printer performance. If you own one Mac computer, follow the guidelines.
- Click on the following download link to get the 123 HP Laserjet M134a driver.
- Check if the driver is compatible with the Mac device before you proceed to install it.
123 HP LaserJet Ultra MFP M134a Driver Installation
Once you have completed the initial printer setup, you must install the drivers on the systems. The process of driver installation is quite easy to perform.
HP Laserjet M134a Setup for Windows
Windows PC users must stick to the steps below to accomplish the driver installation and setup procedure on their Windows systems.
- Download the 123 HP Laserjet M134a printer driver with the assistance of the link provided here. The file will be saved as a .exe file.
- You have three choices: Open, Save or Run. If you choose Open or Run, the downloaded driver will automatically open up, after the download.
- If you opt for the Save option, you can access the file later with just a double-click on the file.
- You need to select the Save option. Go to the Downloads on your Windows PC when the download comes to an end.
- Next, you have to run the software installer. Go through the on-screen guidelines to finish the installation. Now, you can connect your HP Laserjet M134a printer to the Windows device.
HP Laserjet M134a Setup for Mac
Mac users can easily retrieve the appropriate driver for the 123.hp.com/ljm134a printer. Track the steps below.
- Download the latest 123 HP Laserjet M134a printer driver using the download link here. The driver data will get saved as a .dmg file.
- You have to select the Save option to download the driver on your Mac device.
- Simply access the downloaded file from the Download section on your Mac device.
- Next, you have to run the software installer. You may be asked to add the printer to a new printer queue. Then, you have to select the name of the printer to add.
- Select the Print Using or Use option and opt for your HP Laserjet MFP M134a printer from the pop-up menu. Next, carry on with the Add option. Head towards the HP installer to accomplish the installation.
123 HP LaserJet Ultra MFP M134a Wireless Setup
Direct wireless connectivity is not supported by this particular printer. Hence, you need to perform some additional steps to connect your HP Laserjet M134a printer to your computer.
HP Laserjet M134a Connection Setup for Windows
Before you proceed with the connection procedure, you are requested to gather the details and credentials of your wireless network. Additionally, don’t forget to switch on the printer, the wireless router, and the computer. Now, follow the steps below.
- Establish the connection between your computer and the wireless network. You need to connect your printer to the same wireless network. Remove the USB cables if attached to the printer.
- If you have installed the same software for a USB connection then you have to modify some settings. Firstly, remove the USB cable-connection from the printer. Now, again proceed to download and install the printer driver and software.
- When prompted, opt for the Connect Through A Wireless Network option. You might need to again attach a USB cable to the computer.
- Wait till the 123 HP Laserjet M134a software installation gets completed, you may print a configuration report. Make sure that the HP Laserjet MFP M134a should possess an SSID. You can surely remove the USB cable once you get the configuration report.
HP Laserjet M134a Connection Setup for Mac
Mac users also can connect to the HP Laserjet M134a printer with the help of the following steps.
- Gather a USB cable that works fine. Make sure that the printer and the Mac device is running. Quit all the applications on the Mac device.
- Check whether the printer has sufficient papers on the paper input tray. Also, check out if the 123 HP Laserjet M134a printer is in the ready state.
- Finish the USB installation process. You have to assign the Mac device to the wireless network. You need to select the network SSID from the SSIDs of the available networks.
- Opt for the required security protocol that your wireless network uses. Enter all the valid credentials to connect and select the Apply option.
- Under the confirmation window, choose the Ok option and then close the HTML Config and Print Queue window. You have to detach the USB-connected printer and assign the wireless-connected printer to the computer.
Troubleshooting HP Laserjet M134a Printer
Additionally, you get some basic troubleshooting ideas for the 123 HP Laserjet M134a printer. If you are facing difficulty while performing the functions like photo or scanning, then please go through the upcoming sections.
HP Laserjet M134a: How to Print Photos (on Windows)
If you want to print photos with help from your Windows computer then you need to track the guidelines below.
- Check if there is any plain, white paper in the paper tray. If yes, then take them out. Insert photo paper in the main input tray. Choose the photo you want to print.
- Right-click on that photo. Opt for the Open With option. Either select Windows Photo or choose the Paint application. Click on the Print option. Otherwise, go to the File or Menu icon and then choose the Print option.
- You can notice a Print window with some default configuration. You have to explore the 123 HP Laserjet M134a printer’s Document Properties option. There you can alter the settings like quality, color, layout, and other printing settings.
- You can even adjust the orientation of the photo, the source, paper type, border settings, etc.
- After altering the configurations, you need to opt for the Ok option. Lastly, choose the Print option to get the photo perfectly printed on the photo paper.
HP Laserjet M134a: How to Scan (on Windows)
Scanned documents are easy to store and there is less chance to lose it. Follow the simple instructions to start scanning through your Hp Laserjet printer and your Windows computer.
- Before you proceed to scan, ensure that the scan glass is clean and there is no smudge and trace of fingerprints.
- You should install the HP Scan or the HP Easy Scan software. If you have access to this software then you can use the advanced features of the 123 HP Laserjet M134a printer.
- Position the document or the photo with the front side down on the scanner glass. Make sure that you turn the side down that you want to scan.
- Close the scanner lid.
- Next, explore the HP Printer Assistant. Opt for the Scan A Document Or Photo option to initiate the scanning process.
- Create a shortcut matching to the necessities of yours. There are several modification options on the right pane of the window. Lastly, opt for Scan. the document or the photo should start to get scanned.
HP Laserjet M134a: How to Print on Both Sides of the Paper
You can save paper if you go for both-side printing. The procedure is very easy to implement with the steps depicted below.
- You need to select the file from the corresponding software. Then, choose the Print option. Opt for the printer that you want to use, Printer Properties, and Preferences.
- If you can notice a shortcut tab of the 123 HP Laserjet M134a printer, then opt for the option named Both Sides. If there’s no printing shortcut tab then you have to select the Features, Layout, or the Finishing tab.
- Once you find the Print on Both Sides option, opt for the page flip or binding option. You can style the document as a booklet with the help of the Hp Laserjet MFP M134a printer. Select Ok followed by the Print option.
- The print should have started. Wait till the printing gets done. Once the printing gets down, you need to flip the stack of papers and load them again.
- Lastly, opt for the Continue option to finish the both-side printing.
HP Laserjet M134a: How to Check Ink or Toner Levels
If the printer fails to print something, then there might be chances that the ink cartridge is empty. Let’s see how you can check the toner levels.
- Firstly, ensure that the Windows computer is turned on and connected with the active 123 HP Laserjet M134a printer. You need to search for Windows for HP.
- Explore the HP Solution Center from all of the results. You can see the estimated toner levels through that printer software.
- If you are using a Mac device, similarly make sure that the printer is active and connected to the Mac device.
- Go to the Apple icon on the Menu bar. Select the System Preferences option. Then choose Printer and Scanner, Print and Scanner, Print and Fax, or Print and Scan. you have to select the 123hp.com/setup printer from the list. Next, select the Options and Supplies menu. Lastly, click on the Choose Supply Levels tab to get the ink or toner levels of the 123 HP Laserjet M134a printer.
- If the ink levels are lower than the estimated markings, then you need to replace the ink cartridge.