
123 HP Printer USB Setup
When you’re attempting to set up a printer, using the mode of the USB connection is much rather simple and easy. To have a better idea, it is advisable to go through the user manual that is provided. Check out for USB connection section to refer.
Or, you can also get in touch with our professional assistance to get technical help.

Step 1: Prepare Printer For Setup
To set up the printer, you need to prepare the printer in the following ways:
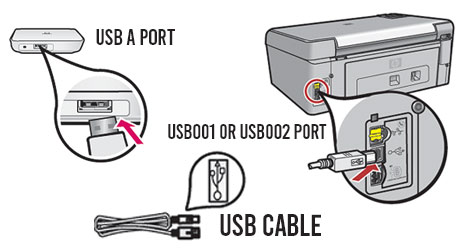
- First, get a USB cable of 3 meters.
- Then check and verify if the cable is long enough or working fine so that you can make the connections.
- Then plug in the USB cable and check if it is connected to the printer or not.
- If the connection is successful and working then take out the cable carefully.
Step 2: Connection and Driver Installation
Now that you’ve made the connection successfully, then the next thing to do is to install the driver. Here’s how to do:
- Go to the website of the manufacturer
- On the search section, type in the printer model number and hit the “OK” button.
- Then, among the list of preferred drivers, choose the compatible one and select the driver download option.
- Now, while you are installing the correct driver, choose USB as the connection type and then you can proceed to configure the connection
USB Setup (For Windows Operating System)
USB Setup (For Mac Operating System)
To set up a USB connection for Windows operating system, follow the steps below:
Prepare For Printer Setup
First, you need to verify that the USB port in the system is functioning or not.
The next thing you need to do is, check if the USB cable is attached to the printer or not. And then check if the connection is successful or not.
Now that you have checked, you can remove the cables.
Driver Installation
To get the drivers, do the following:
- Visit the official manufacturer’s website.
- Then, in the search field, write the model number of the printer and then click on the “OK” button.
- Now you will get a list of all the available drivers.
- Choose the suitable driver for the OS
- Click on “Install” and under the connection type, select “USB” as a mode of connection.
If you have a Mac operating system, then go through these steps to set up the USB connection:
Prepare For Printer Setup
- Verify that the Mac Operating system has a working USB port. Make sure that it is not damaged.
- Again, take a 3 meters USB cable to connect.
- If the USB cable is establishing stable connection with the Mac OS, then unplug the cable.
Driver Installation
- Make sure that you are getting the driver from a trusted source.
- Open the web browser and go to the manufacturer’s official site and locate the driver download web page.
- Look for the compatible compact driver and click on the “Download’ button.
- Now, wait for a short period of time until the driver has been successfully downloaded.
- Now when the installation setup box appears, select USB method as a mode of connection in the ‘Select Connection Type” section.
How To Configure USB Drives?
USB setup (Win)
To configure USB drivers correctly, do these below-mentioned steps one by one:
- Plugin the USB cable into the USB port of the operating system.
- Thereafter, go to the option called “Manage”.
- Select the option that says “Disk Management”. Choose “USB Driver” and then click on the button called “Change”.
- On the “USB Drive” option, right-click on it and choose the option called “Format” to finish the hp printer USB setup.
- Then click on the “Format” button and thereafter, you can start configuring the USB drive. Additionally, you can start transferring or exchanging files into the drive.
To avail the Win setup, do these steps below:
- You can find the Win setup in Windows program.
- It is available as free software for any PCs or even laptops that are of both 32 and 64-bit processors.
- As it is categorized as a boot manager, it is free for any user.
- This has the advantage of using the multiboot USB flash or even disk that are fixed for installation.
Using USB Flash Drive For Printing
USB Troubleshoot
If you want to print anything using the USB Flash Drive, then you have to read these steps below:
- Try inserting the USB drive on the OS port and then navigate to the option that says “Manage”.
- Select the option called “Disk Management” and then choose the “USB driver”. After that click on the “Change” button.
- Upon right-clicking on the “USB Drive” button, choose the “Format” button.
- Then select the “Format” option and start transferring all the files you would like to transfer.
If you encounter any issue with printing while having a USB connection, then do the following steps:
- Look out for the error message that is on the display.
- Disable any third device that is connected between the computer and the printer.
- Then, you can try resetting the USB cable attachment by ejecting the cable from the bottom right taskbar panel on Windows. After that unplug the cable safely from the PC USB port.
- If you still encounter the error, then contact our professional support team to get help.